Tuesday, May 30, 2017

Fun Stampers Journey Express Yourself 5/30/17

Hello Creative Friends.

Today's card is a fun mixed Media card featuring the Express Yourself Stamp Set SS-0335.  This set is a great set to use in Art Journaling and to create cards for all your creative friends.

 
I started with a Cranberry Bliss cardstock base (5-1/2 x 8-1/2).  The next layer is a piece of patterned paper from the Rich Sorbet Prints paper pack PP-0031.  I added some Journey Gesso to tone the color down just a bit.  Then I grabbed my Ink Splat Stamp AT-0108, Cranberry Bliss Silk IP-0094 and a little water to create some interest in the background.  Don't you just love that strip of black pattern??? It's a small piece from the Deco Strips- Black AC-0285 that I just got in!  I really like it and think it will make a lot of appearances in up coming projects.

 
Now to the focal point, the Black Licorice cardstock is (3 x 2-1/4) and I added some of the mini staples to it.  The Whip Cream cardstock is (2-2/34 x 2).  I stamped the brush stroke with Cranberry Bliss ink and the Express Yourself with Black Licorice.  After that, I splattered a little Cranberry Bliss silk on it.  Then I grabbed a piece of scrap Whip Cream and stamped the paintbrush and tube of paint  with Black Licorice.  Both images are colored using Journey Color Burst Pencils.


I will be doing a live video this evening over on my Facebook Page, Cindy's Creative Journey (@ccreativejourney), so make sure you stop by and check it out!
Thanks for stopping by!
Cindy


Wednesday, May 24, 2017

Fun Stampers Journey Rise and Shine meets Color Splash Pencils 5/24

Hello Creative Friends.
 
Today I am sharing a card I created using my featured set,  Rise and Shine Bundle (BD-0132) and Fun Stampers Journey Color Splash Watercolor Pencils.  These birds are just so stinking cute and the sentiments are always inspirational.  My card base is Whip Cream cardstock (11x4-1/4) and the layers are, Beach Ball cardstock(4x 4-5/8), Black Licorice cardstock(3-3/4x4-1/2), Lemon Drop cardstock(3-1/2x4) and Whip Cream cardstock(3-1/4x3-3/4).  I also used my 2"scallop punch to punch a Beach Ball circle.
 
 
To create the background, I pulled out my Color Splash pencils # 1, 16, and 31.  I took my large Blending Brush filled with water and touched it directly to the tip of the #16 pencil and began to paint in circles on to my Whip Cream paper.  After that, I continued to add the two other colors and blend them until I got the effect that I wanted.  Once I finished, I dried it with my heat gun.  On a scrap of Whip Cream, I stamped the large bird and colored it with the same colors and then die cut it out.  I stamped the sentiment and splashed my watercolor background with some Turbo Teal Silk.    I layered the Beach Ball scalloped circle below the sentiment and put a small strip of Whip Cream Sparkle Tape towards the bottom left corner.
 

See those cute little hearts?  Those cuties are on the Break Up sale list!!!  They're part of the Heart and Star button pack and are only available until June 30, so make sure you grab some before they're gone.  I colored them with my #1 pencil, covered them with Journey glaze and sparkle dust.

Thanks for stopping by,
Cindy

Tuesday, May 23, 2017

Fun Stampers Journey Rise and Shine meets Mixed Media 5/23

Hello Creative Friends.

In today's post I am sharing a fun card featuring the stamp set Rise and Shine SS-0337 and a bunch of fun techniques using FSJ Splashes and stencils!  Make sure you go over to my Facebook page @CCreativeJourney,  tomorrow evening (5/24 at 6 pm Eastern time) to catch a live video of the step by step of making this card. 
 I used Blue Lagoon cardstock (11 x 4-1/4) for my card base, a layer of Sweet Berry (5-1/4 x 4), a strip of Pool Play (5 x 2) cut with the  Border Basic Die Set, Whip Cream (3-1/2 x 5), a scrap of Whip Cream, Sweet Berry, and Black Licorice cardstock.  I also used a Black Licorice ink pad and Clear Pigment ink pad for stamping.
 
To make the background I grabbed 3 Media Misters , my Pineapple Smoothie Splash, Blue Lagoon Splash, and Lemongrass Splash and headed to the sink.  I filled the media misters each with 1/2 splash and 1/2 water.  This gives you more control then the actual splash bottles and dilutes the colors for a watercolor effect.  After I prepped the media misters, I grabbed a piece of clear acrylic that I had saved from my stamp sets, and sprayed a few squirts of the Pineapple Smoothie onto the acrylic.  Then I dragged the Whip Cream cardstock through it.  Make sure you use your heat gun to dry between each step.  After the Pineapple Smoothie is dry, wipe off the acrylic sheet, place your Bubble Bubble Stencil on top.  give it a few squirts of both Blue Lagoon Splash and Lemongrass Splash.  Next, pick up the stencil and flip it over onto your Pineapple Smoothie background piece.  This gives you a reverse image of the actual stencil- pretty cool huh?!!!  Dry the background with your heat gun.  Also, I mopped up the extra spray on the stencil with a piece of media paper to use another time.  Ok, now you are ready for the next stencil, Cheveron Stencil , and some Gesso.  Place your stencil on your mixed media background paper, hold it in place and using a Spatula, spread a thin coat of gesso on the left side of your cardstock.  Dry completely with your heat tool.


Now we get to stamp!  I cut the Happy off of one of the sentiments in the Rise and Shine set ( you know me, I like to cut my stamps apart?), and inked it up with Black Licorice ink.  I stamped it multiple times down the left side of my media background.  After that I added some Bubble Gum Silk, because you know you have to have Silk Spashes on everything!  Then I stamped both birds onto a scrap of Whip Cream cardstock and punched them out using the 1-1/2"Punch & the 1-3/4" Punch .  I colored them using my Journey Color Burst Pencils. (04,17,23,25,28) and then mounted them onto Sweet Berry scrapes punched with Scalloped Circle Punch 1-3/4 & Scalloped Circle Punch 2".  I looped some Black Twine behind them and mounted them with pop dots.  Then I put my sentiment back together, stamped it onto a scrap of Black Licorice with Clear Embossing ink and covered it with White Embossing powder, cooked it, and placed it ton my card front.
 

Thanks for stopping by today! 
Make sure to stop by my Facebook page Cindy's Creative Journey (@ccreativejourney) for live videos and updates.
Cindy

Monday, May 22, 2017

Happy Mail Monday 5/22

Hello Creative Friends!
I woke up today in a motivated mood, got my to-do list written, and now I'm checking things off!  Whoo Hoo!!! Don't you love when you wake up like that?
So, one of the first things on my Monday list is also one of the best things on my list, Happy Mail Monday post!  Make sure you leave a comment either here on my blog, on Instagram (CindysCreativeJourney), or on my Face Book page (@ccreativejourney).

 
I tried out a fun technique RG showed us using the Rich Sorbet Pan Pastels.  I also used the darkest green from this set of Mother Nature Pan Pastels .  I covered the piece of Whip Cream cardstock with the Summer Days Pan Pastel, then I added the Kiwi Slice Pan Pastels and the Fresh Forest Pan Pastels to create that cool background.  To set the Pan Pastels, I sprayed it with aerosol hair spray.  I also used the Kiwi Slice Pan Pastel on a smaller scrap of Whip Cream.  I stamped the smallest turtle from the Turtley Awesome Bundle onto the smaller scrap with Black Licorice ink.  Then I also stamped the sea weed onto the larger piece of cardstock to create the background for my card.  The Hi There sentiment is stamped with Black Licorice onto a Vellum Circle and then layered onto a Summer Days Circle.

 
You gotta love our Silks!!! They add the perfect touch to your cards.  Here I used both the Gold Silk and the brand new Sparkle Silk on  the background.  I also painted it onto my turtle.  The gems are called Sea Stones, and you better grab 2 packages because you are going to love them that much!
 
Make sure to leave a comment to be entered into the Happy Mail Monday card, if your name is drawn, you can choose to send this card to a friend, or yourself!
 
Thanks for stopping by,
Cindy


Thursday, May 18, 2017

Fun Stampers Journey: Snappy Birthday 5/18/17

Hello Creative Friends!
Today's card is another fast card that uses Fun Stampers Journey Dauber Dowel to create a fun background.  I am in total love with these daubers!

 
I started with a Whip Cream card base (5-1/2 x 8-1/2), layered a piece of Rich Coral cardstock (4 x 5-1/4) onto it.  Then a grabbed another piece of Whip Cream cardstock (3-3/4 x 5) to make my background.  I started with my Catalina Splash ink pad, swirled my dauber on top of it and then began to swirl it onto my cardstock.  You can get a lot of variance in the color depending on how much ink you have on your dauber and what part of the dauber you use.  I also swirled some Whip Cream Ink onto the water part of my card using the edge of my dauber.  The sky is done in the same fashion using both a Summer Days ink pad and a Tangerine Fusion ink pad.  Next I stamped the sentiment in Black Licorice ink.  The final touch on the background is to add flicks of both Citrus Cooler Silk and Journey Bronze Silk.  


Once the background was dry, I adhered it to the card base.  For the crab, I used the largest crab from the Snappy Birthday Bundle and added Tangerine Fusion Ink over the entire crab stamp.  Then I rocked some Rich Coral Ink around the edges.  That gives your crab a little variance in color.  The finishing touch for this card was 3 loops of Journey Black Twine.


Don't forget that the Break Up Sale and the Clearance Rack go Live Today!!!

Thanks for stopping by!
Cindy


Wednesday, May 17, 2017

Fun Stampers Journey Snappy Birthday 5/17/17

Hello Creative Friends!
 
It's Wednesday and that means the week is half way over...and I feel like I am soooo far behind!  My to- do list is a mile long and as soon as I check something off, I add to more to dos!!!  So I took a break to create this card for my hubby, and yes, I was a wee bit crabby last night.
 
 
This card starts with a Rich Coral CS base cut to 8-1/2 x 5-1/2.  I used a the coral print from the Under the Sea Prints paper pack (PP-0041) cut to 4-1/4 x 3-3/4, a Cool Pool CS cut to 4-1/2 x 3-1/2, and Buttercream CS cut to 4-1/4 x 3-1/4. 

 
Take a look at that sand, that is the piece of Buttercream CS, don't you love how it has that sandy look?  You can recreate it by taking your large Dauber Dowel (TO-0138) and Oatmeal Cookie IP and make swirling motions on your cardstock.  Keep adding ink until you get your sand just how you like it!  Next I stamped the sentiment with my Black Licorice IP.  I grabbed a scrap of Buttercream CS for my large crab from the Snappy Birthday Bundle (BD-0236)  To get the variation of colors on my crab, I inked it up first with my Tangerine Fusion IP, and then lightly tapped my Rich Coral IP on the edges.  Love how it looks with the 2 colors blended, and don't worry, it doesn't ruin your inkpads.  Make sure you always start with the lightest inkpad first!
 
 
The coral print paper is adhered straight to the card base.  I adhered the sand technique piece right to my Cool Pool CS and the popped that piece on to the card.  Next, I took some Black Journey Twine (AC-0004) and made my loops.  Then I die cut my crab and popped him onto the card front.  He got a heavy coat of Journey Glaze (best product ever!!!) and then to put a little bling on it, I grabbed my box of Rainbow Drops (AC-0178) and added 3 of the red gems.
 
Hope you enjoyed today's card!  
Thanks for stopping by,
Cindy


Tuesday, May 16, 2017

Fun Stampers Journey Snappy Birthday 5/16

Hello Creative Friends!

Today's card is featuring the Snappy Birthday Stamp set (SS-0440) out of the Spring into Summer Mini Trends catalog.  This catalog runs until June 30, so if you love this set, make sure you get it before it's gone!  I am also giving you a sneak peak of a new die that goes live July 1!!!  The new die is called Film Frame (DI-0278), and I think it will be a must have addition for all of you scrapbookers out there!

 
I started this card with a Buttercream base cut 4-1/4 x 11, and layered it with a fun patterned paper piece from the Under the Sea paper pack (PP-0041) cut to 4 x 5-1/4.  The  Film Frame die is cut from Catalina Splash cardstock.

 
For this card I chose the medium and small crab from the Snappy Birthday stamp set.  I stamped them with Whip Cream ink (IP-0009) and heat embossed them with Journey Clear Embossing Powder (IP-0097).  Do you see the Sparkle Silk (IP-0126)?  I am in Love with this stuff!!!!  I know it is on back order, but you need to get some!!!  I popped the Film Frame panel up and then added some of the blue gems from the Rainbow Drops embellishment tray (AC-0178) to finish off my card.
 
Such a fast and fun card to send my friend for her birthday! 
Thanks for stopping by,
Cindy

Monday, May 15, 2017

Happy Mail Monday 5/15

Hello Creative Friends.

It's Monday, so that means it's time for my Happy Mail Monday give away!!!  Leave a comment here or on any of my Social media sites (Facebook or Cindy'sCreativeJourney on Instagram) to win this card to send to a friend!


I mean, who wouldn't love to receive this bright card in the mail just to say hi?  She is just so stinking cute! and she makes me want to go to the islands!!!

 
I stamped the Palm Fronds (AT-0209)  with Kiwi Slice ink.  Then I grabbed the Let's Hula Bundle (BD-0148) and stamped the girl with Black Licorice ink and die cut her.  Don't you just love when the stamp set comes with matching dies?!!!  She is colored with Journey Color Burst Pencils (JM-0077)  and popped up on the circle die (DI-0039). 
 
Don't forget to leave a comment for your chance to send this Happy Mail to your friend just to say "Hi"
 
Have an Amazing day!
Cindy

Saturday, May 13, 2017

Fun Stampers Journey Break Up Sale

Hello Creative Friends,

It's that time of the year again, time for the Break Up Sale! What's the Break-Up Sale you ask?  These are the items from the 2016-2017 catalog that will be retiring on June 30, 2017 to make room for all the new goodies coming in the New Catalog!!!!

That means that if you love one of the stamps on the list, you better order it first thing on Tuesday May 16, 2017!! 


Make you sure you check out the entire list here:   Break Up List

 
There is also an new Clearance Rack to check out!  Here is the link for it:  Clearance Rack
 
 
Make sure you grab you must haves fast, because once they are gone, their gone for good!
 
Happy Shopping!
Cindy


Friday, May 12, 2017

Fun Stampers Journey Artful Fins 5/12

Hello Creative Friends.

It's Fri-yay!!!! we made it to the weekend! and sadly to the last card with our featured stamp set, Artful Fins.  The Artful Fins set is in the Spring into Summer mini Catalog, so if you want it, you have until June 30 to order it!  Better yet, order by 12:00pm CST time tomorrow and you will receive the card kit to create Monday's Step card!


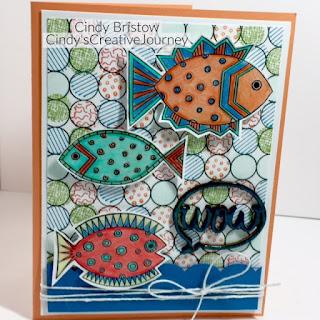
Today I combined the Artful Fins stamp with another stamp from our Spring into Summer Mini.  See that fun background?  It is made with the Create a Dot Stamp Set.  It was designed so that you can stamp the entire background with all of those blank circles, and then fill in the pattern with the smaller circles!  Such a cool stamp and I am sure you will see me use it several more times before June 30. 


I colored the fish with my Color Burst Pencils, and I can't tell you enough how vibrant these pencils are!  They are loaded with pigment and color soooo smoothly!  Don't you just love that stinking cute scallop die cut?  It is one of several that are included in the Border Basic Die set.


How about that wooden element?  It's from the Hello Word Bubble pack.  I love all of Fun Stampers Journey's wooden elements, you can leave them plain, or ink them up like I did with this one.

Don't forget that if you place an order with me, make sure to attach it to Party order # 12660 so that you are entered in the Mystery Hostess drawing this week!

Thanks for stopping by,
Cindy

Thursday, May 11, 2017

Fun Stampers Journey Artful Fins 5/11

Hello Creative Friends.

I can't believe how fast this week is going! It is already Thursday and my vacation is going way to fast!  Yesterday I shared a Mixed Media project with you and today's card is considered a Mixed Media project also.  See the background?  Bet you thought that was a watercolor wash!  Well, you are 1/2 right, and 1/2 not so right.


This background is considered Mixed media and is done using Fun Stampers Journey Color Splashes and our Color Splash sheets.  Your start by wetting your Color Splash Sheet with a Media Mister filled with water.  Go ahead and get it nice and wet.  Then you are going to spray it with Citrus Cooler Color Spash ( make sure you have your paper in a spray box so you don't get overspray on other things).  You can pick the paper up and move the color around if you have sprayed enough water on your sheet.  Next you will spray the paper again with Sweet Berry Color Splash.  You may want to mist your paper again with the water to move the color more.  After you get the look you like, you can dry it with your Heat Gun


I finished the background paper by splattering it with Bubble Gum Silk and Citrus Cooler Silk.  Don't you just love that Bloom Cluster Die cut from Bubble Gum CS in the background, kind of a subtle touch that adds so much.  While I was at my Platinum machine, I also cut a Sweet Text Bubble die out of Beach Ball CS.


I stamped 2 of the fish from the Artful Fins Stamp set and colored them with Color Burst Pencils, covered them in Journey Glaze and a sprinkle of Clear Confetti Sparkle Elements.  The finishing touch is the Whip Cream Sparkle Tape  in the bottom left corner.

Don't forget that if you are ordering the Artful Fins set from me this week, you will receive a card kit to create Monday's card!  Also, if you add your order to Party #12660, you will be entered in the Mystery Party Hostess drawing to win the Hostess benefits for this weeks party! 

Stay Creative!
Cindy

Wednesday, May 10, 2017

Fun Stampers Journey Artful Fins Mixed Media 5/10

Hello Creative Friends.

Have you tried mixed media?  Are you just a bit intimidated by the term because you don't know exactly what it means?  Have no fear,  I am going to start a weekly post on mixed media and walk you through some of the terms and techniques!  This week's Mixed Media project is one that is pretty basic and uses items that you might already have.


I started this project off with the House to Home Trio of wooden blocks.  These are quite user friendly and the largest one only measures 5-5/8 x 5-5/8, which makes them the perfect size for the first time mixed media artist.  I painted all 3 blocks with Journey Gesso that in this case acts like a primer for the wood blocks.  After the gesso dried, I painted the back and sides of the wood with Pineapple Smoothie Acrylic Paint.  Fun Stampers Journey acrylic paints are a medium weight paint, so they are a bit thicker then the paint you get in bottles from your local craft store.


After the paint dried, I cut patterned paper pieces from the Party Pop Prints Collection paper pack to fit each block.  I also added small strips of Rich Coral and Beach Breeze CS to add some interest.  All of the cardstock is glued down with Craft Glue.  I always use craft glue because it holds so well!


The small dots you see are done with Modeling Paste, a Spatula, and the Ball Chain Stencil.  Modeling Paste is a heavy weight medium that holds it shape well and when dry is quite hard.  My husband refers to it as spackling stuff....  You lay your stencil down on the block, dip your spatula into the modeling paste and then spread it over the stencil like you are icing a cake.  Next pull the stencil directly up.  After you are finished with the stencil and spatula, make sure you wash them off with warm water, or else the paste dries and it is very hard to clean off.  You can let the Modeling paste dry on it's own, or speed it along with a heat gun.  I added pieces of Black Journey Twine with Journey glaze to add some definition between the paper strips.


All of the fish come from this weeks featured stamp set, Artful Fins, and where colored with Color Burst Pencils.  Each fish was covered in Journey Glaze, sprinkled with Clear Confetti Sparkle elements.  Once the glaze was dry, I put several coats of Journey Gel Medium over the entire block to seal the project.
 
Remember that if you purchase the Artful Fins stamp set from me this week, I will send you a free card kit for the card featured on 5/8/2017 post.

 
Thanks for stopping by,
Cindy


Tuesday, May 9, 2017

Fun Stampers Journey Artful Fins 5/9

Hello Creative Friends.

Today's card is fun card that is fairly fast to create. 


I started with a Buttercream card base and layered a piece of the coral print from the Under Sea The Sea Prints pack on top.  Next I cut two thin strips of Orange Creamsicle and two pieces of Buttercream CS.  After I adhered the Creamsicle CS to the Buttercream CS, I popped it up onto my card base.


Love the look of Beach Breeze ink sponged onto the circle of Pool Play ink, it just looks so refreshing!  I used the new large Dauber Dowel , to get the ink on there with out getting my fingers too inky.  Something tells me that I will have a Dauber Dowel for everyone of my inkpads before the year is over.  I used Color Burst Pencils to make my fish nice and bright.


Today's sentiment came from another set in the Spring into Summer mini.  The "Hi There" sentiment come from the Turtley Awesome Stamp Set
 
 
Remember that if you order the Artful Fins Stamp Set from me this week, you will receive  the Free card kit to make the amazing side step card I posted on May 8.
Make sure you add it to the Mystery Hostess party, Party #12660 to be included in the drawing to become Mystery hostess of the week!!! 
 
Thanks for stopping by,
Cindy

Monday, May 8, 2017

Fun Stampers Journey Artful Fins 5-8

Hello Creative Friends,
If you stopped by yesterday, you saw the cute Planer Girl layout I did with this week's Featured Set, Artful Fins.  It's such a fun set that you can color in a variety of ways.  If you purchase the Artful Fins Set  from me this week, you will receive the kit to make today's card FREE!  That's right, a Free card kit to create this fun Stair Step card.  Each kit is completely ready for you to stamp, color and put together!

 
 It makes me think of a tropical vacation or a tiki hut! I started with a Cool Pool Stair Step Base and layered it with some retired paper from the Going Places collection.  Don't you just love how the Sweet Pear Doily Die looks like it could be a piece of coral?


Today's card was colored with Color Burst Pencils  #21, #24, #34.  Check out those sparkly scales of my fish!!! You can recreate this effect by covering your fish with Journey Glaze, and the sprinkling some Confetti Sparkle Elements Clear Sparkle on top.  I added some to all of my fish today. 


And if those scales weren't enough sparkle, I also added some of the Whip Cream Sparkle Tape over a thin strip of Catalina Splash cardstock!

Don't forget, you could receive this card kit Free when you purchase the Artful Fins Stamp Set from me this week.  If you are really feeling lucky, add it to the Mystery Hostess Party # 120660 for your chance to be this weeks Mystery Hostess!

Thanks for stopping by,
Cindy

Sunday, May 7, 2017

Planner Girl Sunday 5/7

Hello Creative Friends

Where did the weekend go?!!!!  Sunday always comes to fast, but I know that when it's Sunday, I get to play in my Brushed Cool Pool Days Planner!  Love this larger A-5 planner, and it is extra special because the man himself, RG (Richard Garay) gave it to me at our Leadership Team Retreat back in December!

Planner Layout May 8-14, 2017
 
This week I used the polka dot washi tape from Be Cool Journey Tape set to reinforce the holes.  I also used it to divide my days up.  See all those cute little fish?!!!  Can you guess what my featured stamp set is for the week?...... drum roll please..... Artful Fins SS-0443  aren't they all just adorable?!!  I also used a few dies in this weeks layout, just so I had a bit more real estate to journal on.  I used the Notebook Page Die to jot down a few reminders and the Journey Days Create a Tab Die to inspire me to do what makes me happy.
 
Journey Day Tab May 8-14, 2017
 
 
Soooo, are you ready for a week of fun inspiration using these stinking cute fish from the Artful Fins set?!!!!  Don't forget that if you place an order with me, add it to the Mystery Hostess Party, Party #12660 
 
Have a creative day!
Cindy


Friday, May 5, 2017

Fun Stampers Journey Wonderful Day Feature Stamp

Hello Creative Friends

It's Fri-Yay!!! and that means it's the weekend!!! 

It also means that there are only 2 days left to grab one of my featured stamp sets for the week.  This week's featured sets are Wonderful Day, and Bike Life!  When you order either of these sets, (or better yet, both of them!!!)  I will send you the card kit(s) to create these to fun cards!


Wonderful Day Kit


Bike Life Kit


Make sure you check out my Facebook Page also because I will be doing a FB Live broadcast this afternoon at 5:00 EST!!!
 
 
Have a wonderful day and go be Creative!!!!
Cindy


Wednesday, May 3, 2017

Keep Your Balance

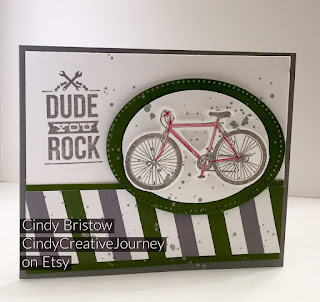
Hello Creative Friends.  One of this week's featured stamp sets is called Bike Life.


What is a featured stamp set?  Every week I will pick 1 or 2 stamp sets to create with.  If you order the featured set from me, I will send you a card kit to complete with your brand new stamp set!  As a bonus, if you add it to the Mystery Hostess Party order and your name is chosen for that week, you will receive Hostess Benefits for that week's party!!!
 This Week's Hostess Party number is Party # 12660


This is the card that you will receive your free kit to create with!!!  All you will need to complete it is Riverstone Ink, Silver Silk, Adhesive, and Dimensional Dots.
 
 
Ok, now on to today's card.  It features Bike Life,  Riverstone cardstock and ink, Forest Green cardstock, Whipcream cardstock, our Journey Circle Dies, Color Burst Pencils, and Silver Silk. 
 
Thanks for stopping by,
Cindy