Tuesday, February 28, 2017

Technique Tuesday: Amazing Day One Sheet Wonder

Hello Creative Friends

I'm sure most of you have heard of a One Sheet Wonder Technique, but just in case you haven't or if you are like me and have forgotten how easy it is  to create a fabulous gift pack of coordinating cards for you bestie.... here is my take on the One Sheet Wonder!


I started out by choosing a patterned paper from the Sweet Spring paper pack.  This happens to be a 6x6 pack that coordinates with Pink Bubble Gum, Cool Pool, and River Stone and it's perfect to combine with the Amazing Day stamp set.


This is the 6x6 diagram for the instructions on cutting the patterned paper.  I also used 3 sheets of 8-1/2x11 Pink Bubble Gum CS, 1 Sheet of 12x12 River Stone CS, 1 sheet of 8-1/2 Cool Pool CS, and 1 sheet of 12x12 Buttercream CS(plus a few scraps)


I used 2 stamp sets for these cards.  The first set I used is a background stamp, Whimsy Wallpaper, and I stamped it on all of the large Buttercream CS with Cool Pool ink.  The second set I used was the Amazing Day stamp set.  To give some variety, I mixed up the sayings on the cards.  I choose to use the tulips for my image on all of the cards.  They are colored with Fun Stampers Journey Color Burst Pencils,# 04, 05, 06, 21, 22, 23, 24, and 34.


I used Cool Pool Silk along with yummy enamel Candy Dots embellishments on all of the cards.  The Pink Bubble Gum Satin Ribbon and Twine adds a nice touch to finish the cards off. 


Here is a list with links of products used to create this set of cards:
Sweet Spring PP, Whimsy Wallpaper, Cool Pool IP, Amazing Day Stamp Set, Journey Color Burst Pencils, Cool Pool Silk, Candy Dots, Bubble Gum Satin Ribbon, Bubble Gum Thread,

Thanks for stopping by,
Cindy


Friday, February 24, 2017

Show me your Green!

Hello Creative Friends,
 
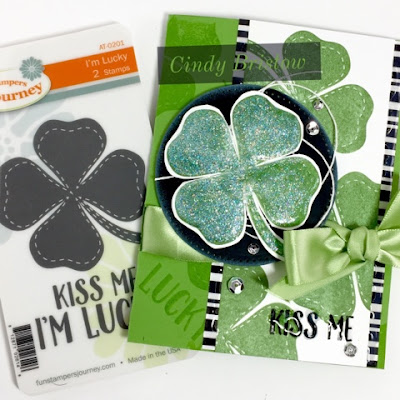
Today I am sharing a card I created for my friend Rose's  FB challenge group.  The name of the group is One Journey Coaches Challenge.  This week's challenge was to create a card for St. Patrick's Day.  Lucky me- I had a St. Patty's stamp!!!
 
 
I started out with a Limeade Splash CS base.  I then pulled out the I'm Lucky AT stamp.  I loved the 4 leaf clover just the way it was, but I took the saying and cut it apart so that I could use different parts of it separately.  Once I had the sentiment cut apart, I used the clover and the luck to create my background (more background stamping!!!)  I really wanted to layer the green on this card, so I used my Limeade Splash IP to do some tone on tone stamping with my background.
 
To create the Whip Cream CS panel (2-1/2 x 5-1/2)  I used the clover and Kiwi Slice IP to stamp the three images.  Make sure you rotate your stamp!!!   Using Black Licorice IP, stamp the Kiss me sentiment on the bottom right of this panel.  Then I used some scraps of patterned paper from my Sweet Spring PP for the black and white stripes (1/2 x 5-1/2) to edge my Whip Cream CS panel.  I adhered this down to my card base.
 
I pulled out my trusty Slit Punch to make a slit in the folded part of my card... it wasn't quite as high as I needed it , so I used my Detail Pro Shears to elongate it.  I wrapped Lemon Grass Satin Ribbon through the slit and tied a bow to the right hand side of my card.
Now for the focal point, I cut a Black Licorice CS circle using my Journey Circle die.  The edges are inked with Whip Cream IP to give it more depth.  I looped some Whip Cream thread and adhered it to the circle with a pop dot.  The clover is stamped on a scrap of Whip Cream CS using Kiwi Slice IP.  Fussy cut it out making sure that you cut between the clover leaves.  Then using your Crease Tool, gently curl your leaves.  Pop the clover onto your Black Licorice circle with pop dots.  The entire Black Licorice piece is the popped dotted on to your card.
 
Now it's time to add the Bling!!!  I added some Special Celebration sequins and then covered my clover with Journey Glaze and Sparkle Dust.  I also Journey Glazed the Kiss Me to make it pop.
 
Here is  the complete list of items used if you would like to order them and create this card at home.
Limeade Splash CS, Whip Cream CS, Black Licorice CS, Limeade Splash IP, Kiwi Slice IP, Black Licorice IP, Whip Cream IP
 
Thanks for stopping by and have and Amazing Day!
Cindy


Thursday, February 23, 2017

Guardian Angel Watercolor Card

Hello Creative Friends,

Today I am sharing a card using the same background stamping technique that I shared earlier in the week. 

See all those little crowns, well they are 3 small little stamps that come in this stinking cute set, Guardian Angel, SS-0185.  My first thought was to give the angel a crown, and then, I had a ah ha moment and thought, let's use them for my background! 

 
I did a video for you on exactly how to create this card!  Here are the numbers of the Color Splash pencils I used, so you can play along! 
06, 08, 09, 12, 14, 18, 23, 25, 34, and 38
 
 
I hope you enjoyed today's video.  As always, if you would like to purchase any of the items I used in the video, I have links listed below.
 
Pineapple Smoothie CS, Pool Play CS, Whip Cream CS, Black Licorice Ink, Bubble Gum Satin Ribbon, Blue Skies Sequins
 
Thanks for stopping by,
Cindy


Tuesday, February 21, 2017

Technique Tuesday: Find Joy

Hello Creative Friends,

I have gotten settled in my new house and am ready to share and create again!!!  What better way to share then to show you a fast technique to make this stinking cute card.

 
In fact, you can create this card in 10 minutes or less!  Here is the video on how it is done.
 
 
Here is the list of all items I used to create this card:
Pink Bubble Gum Ink, Black Licorice Ink, Pink Bubble Gum CS, Black Licorice CS, Whip Cream CS, Brush Silver CS, Paper Clip Elements, Red Journey Twine, and Cut Rhinestones
 
Thanks for stopping by,
Cindy